How to Set Up Google Search Console: Verification, Alternatives, And More
To succeed in the competitive world of SEO, the first thing you need to do after setting up your website is to get a GSC account. You don’t have to verify your website in Google Search Console to show up in search results, but you need to do it to have access to all the important data GSC provides. Google Search Console is an invaluable tool for webmasters as it helps to identify site errors, get Google to index all website pages, find out if your site is mobile-friendly, what keywords people use to find it, and more.
And today, our goal is to tell you how to do it right.
How to add your site to Google Search Console
To add your website to GSC and verify your ownership, you need to sign in to Google Search Console, click Add New Property, choose and use one of the five available methods:
- Domain name provider
- HTML tag
- HTML file
- Google Analytics tracking code
- Google Tag Manager container snippet
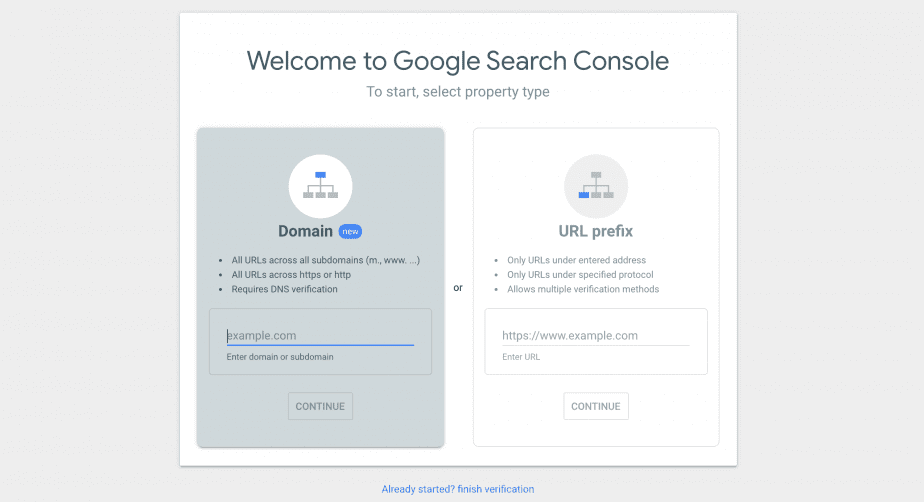
Domain property in Search Console
After selecting Add New Property, you will have to choose a property type. GSC allows verification of the two website property types: URL-prefix property and Domain property. Unlike the URL-prefix property that supports several verification types, the latter stands for DNS record verification only. A domain property includes all subdomains such as m, www, and multiple protocols: http, https, ftp.
DNS verification is one of the best methods to verify your website because you won’t have to verify your property again in case you need to switch from HTTP to HTTPS or www to non-www in the future.
Verifying via your domain name provider
A Domain property URL does not contain an http/https protocol and ignores www (if you add www.website.com, the property will be created as website.com). It also covers all subdomains and subpaths. For example, if a Domain property is website.com, then besides the domain name, the data includes such subdomains as:
- support.m.example.com
- m.example.com
To verify your ownership using the DNS record method, take the following steps:
- Select the domain property type in Search Console.
- Choose your DNS provider from the DNS Providers list. For example, if your provider is Gandi.net, choose it and click Start Verification. Log in to Gandi.net, click Authorize, and then wait for some time (verification can take up to a day) until your ownership is verified.
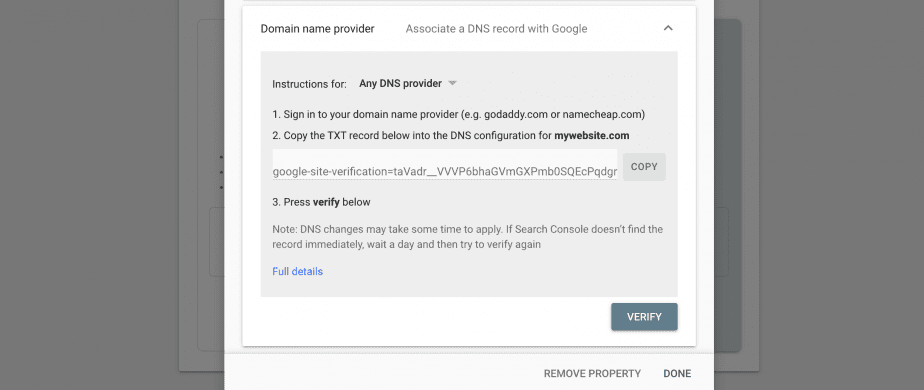
Note that if you don’t know what your domain host is, take a look at the Google instructions on how to find your domain host. After identifying the DNS provider, choose it in the drop-down list, or select Any DNS provider.
URL-prefix property in Search Console
URL-prefix property supports four verification methods: HTML file upload, Meta tag, Google Analytics, and Google tag manager. This property type lets users analyze individual subsections of a website in Google Search Console. For example, if your site contains subfolders covering Germany and France, you can consider creating separate accounts for these properties:
- https://www.website.com/
- https://www.website.com/germany/
- https://www.website.com/france/
You also have to add a separate property for multiple protocols http and https:
- http://www.website.com/
- https://www.website.com/
And a separate property for each subdomain:
- http://m.website.com/
- http://website.com
- http://www.website.com
Here are all the ways to add a URL-prefix property to your Search Console account.
To verify your ownership by adding a meta tag, you need to do the following:
- Select the URL Prefix property type and add your website URL.
- Go to Other Verification methods and select the HTML tag option.
- Copy the provided meta tag.
- Paste it into your website’s home page head tag.
- Click Verify in Search Console—your ownership will be verified immediately.
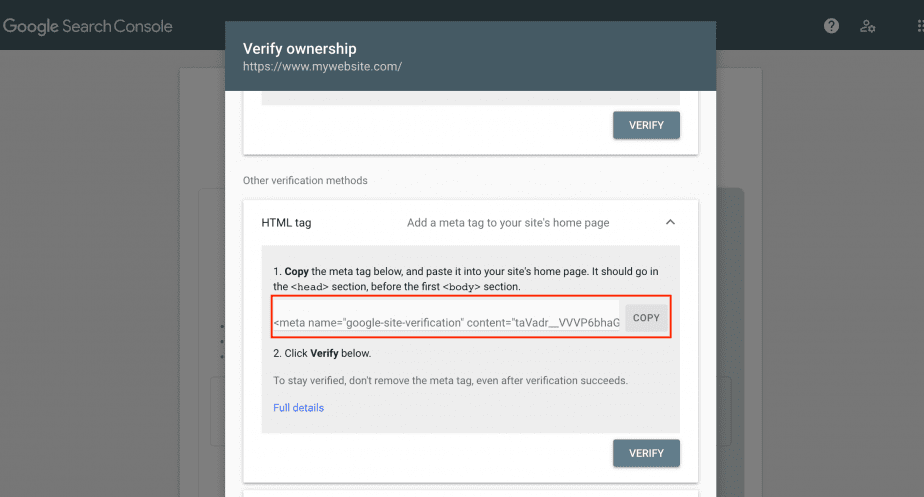
Please note that only the person who has permission to edit the source code of the site can verify ownership, and the meta tag should be pasted as it is, without any changes. Make sure that there is a tag on your live page—just visit the home page and find the meta tag in your page source text.
Verify your ownership by uploading an HTML file
To complete Google Search Console verification by uploading an HTML file, add your website URL in the URL Prefix property field as it appears in the browser’s address bar and take the following steps:
- Expand the HTML section.
- Download the provided verification file.
- Upload it to the root directory, the topmost folder that holds all of the files that make up your whole website.
- Click Verify in Search Console
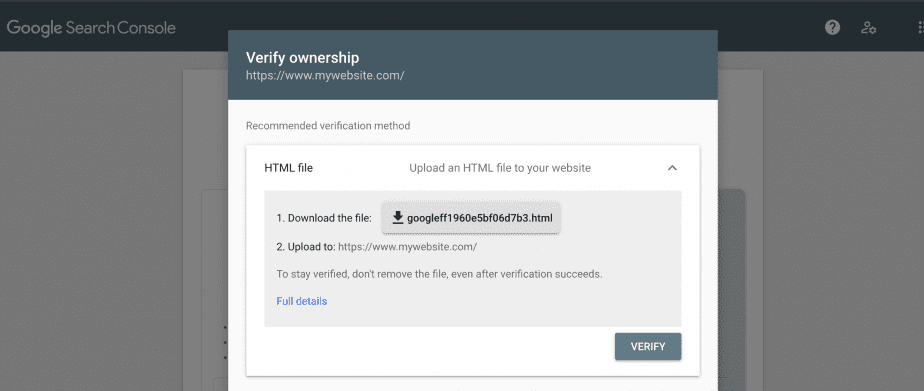
It is important to note that this file is reusable—you can add it to any site you own as it is personalized to a specific user.
Verify your site uses the Google Analytics tracking code
You can also connect Google Search Console to Google Analytics. For this, take the following steps:
- Make sure that you have a Google Analytics account that uses the same Google account and that you have at least editing permission.
- Make sure that there is the Google Analytics tracking code on your home page in the head section—otherwise, let’s say if you put it in the body section, this method will not work.
- Log in to Search Console with the account you use for Google Analytics.
- Click Add Property, enter your website URL and choose the Google Analytics section.
- Verify the ownership.
If you do everything right, it will be verified immediately.

Google Tag Manager container snippet code
Another way to submit your site to Google Search Console is to use the Google Tag Manager container snippet. To complete the verification, take the following steps:
- Make sure that you have published permission to your container.
- Log in to the Search Console using the same account that you use for Google Tag Manager.
- Make sure that there is a piece of a script of the Tag Manager code on the home page, right after the body tag.
- Click Add Property, enter your website URL, choose the Google Tag Manager section.

How to add users and manage permissions
Once you sign in to Google Search Console and confirm that you are a property owner, you will be able to grant permissions to other users.
Here are the user role permissions:
- Owner—has access to all features of the Console and can grant permissions to other users.
- Full users—can view any data and take certain actions.
- Restricted users—can view most data.
- Associate—can view part of the data or take some actions, but not in the Console, depending on the type of association, for example, a channel on YouTube.
To add a user, an owner needs to take the following steps:
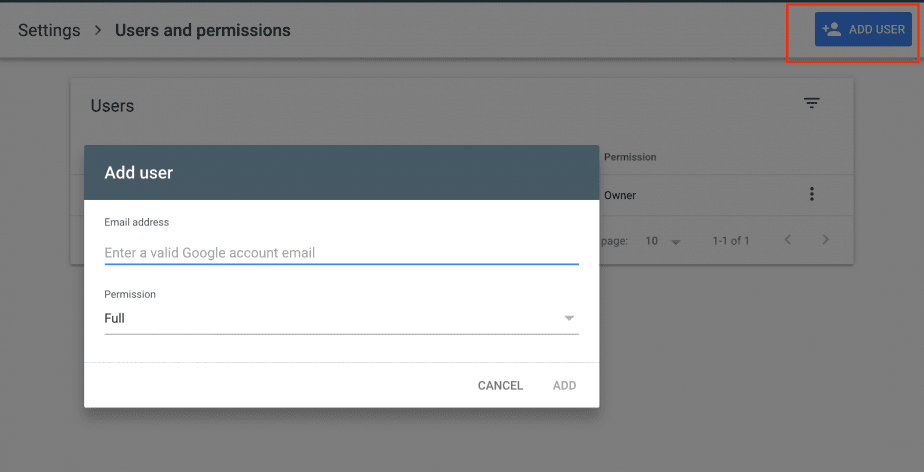
- Choose the property.
- Go to Settings, click Users and permissions.
- Select Add user, enter the email of the user and choose the type of permission.
- Make sure that the users added your property to their property list.
To delete a user, the owner needs to take the following steps:
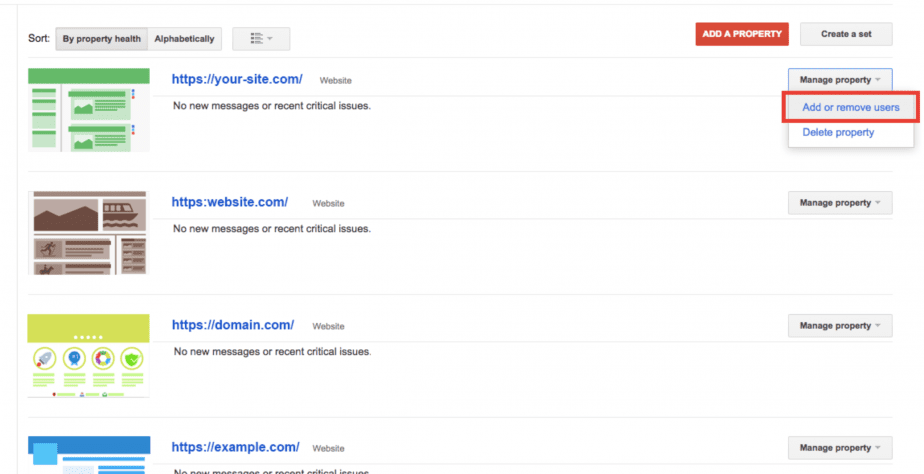
- Choose property.
- Go to Settings, click Users.
- Go to the More menu near the name of the user and choose the delete option.
How to connect Google Search Console to different Content Management Systems
Here we will explain how to connect Google Search Console to your site depending on what CMS you are using. You can verify your WordPress or Shopify site in GSC to optimize it for SEO. Here are the simple steps to connect to the three most popular CMS: WordPress, Shopify, and Wix.
Add your WordPress site to Google Search Console
To verify a WordPress site in Google Search Console you have to download an HTML file. For this, please refer to the instruction for verifying your ownership by uploading an HTML file. You can add the file directly to the header.php file above the <body> tag or use the specific plugin called the Insert Headers and Footers.
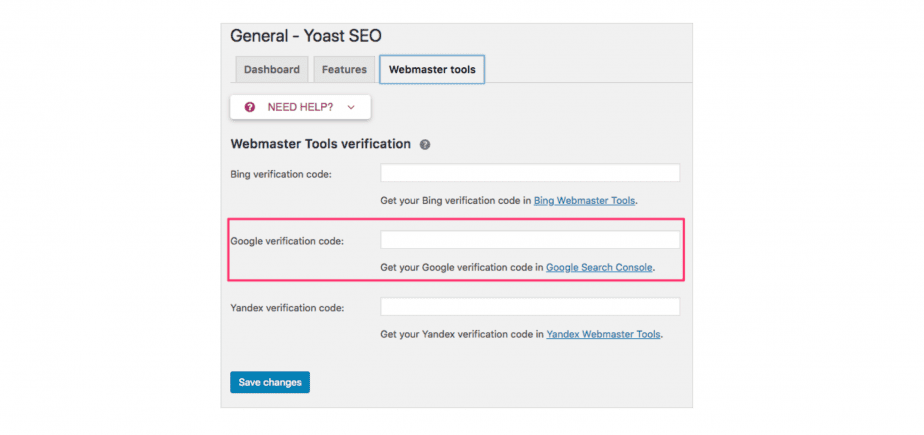
If you have installed Yoast, Search Console can be connected to your website the following way:
- Copy a meta tag using the method of Verifying your ownership by adding a <meta> tag to your site.
- Log in to your WordPress site.
- Select SEO > General > click on the Webmaster Tools tab.
- Paste the Google verification code and save changes.
- Go to the Google Search Console and click Verify.
Google Search Console and Shopify
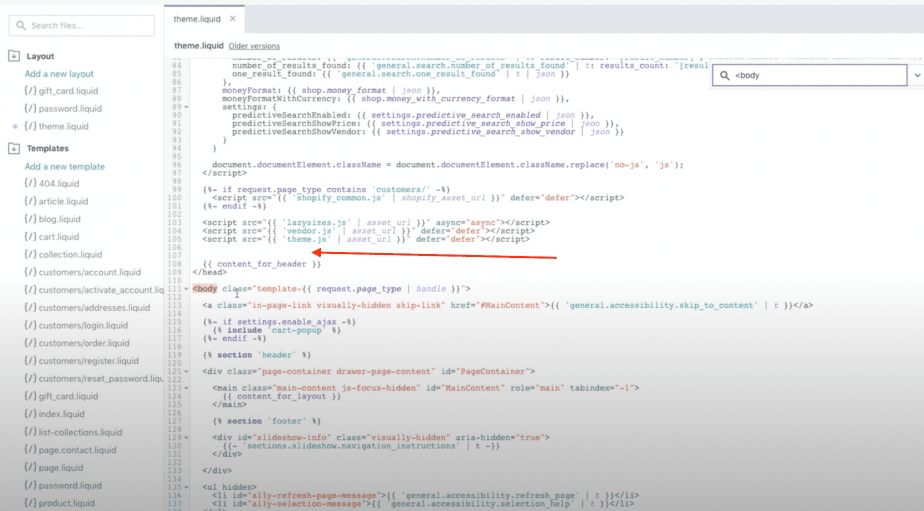
To connect Google Search Console and Shopify, you can use the HTML meta tag. To retrieve the tag, please see the instructions above. Paste the code into your Shopify theme after logging in to the Shopify store. For this, click Online Stores > Themes > Action > Edit Code. Right after the closing <head> tag and before the <body> tag, paste the code and hit Save. Then, go back to Google Search Console and click Verify.
Connect Wix to Google Search Console
If you want to connect Wix to the Console, you will have to retrieve a meta tag according to the instructions described in the section above.
To add your tag to the Wix site:
- Go to your Wix dashboard and click SEO Tools.
- Choose Site Verification.
- Click on Google Search Console.
- Insert the meta tag and Click Save.
What are the alternatives to GSC in different search engines?
There are several bigger alternatives to Google Search Console now. They have similar features and also enable webmasters to control all the processes in your website, monitor any changes, and find problems. Among the top options are Bing Webmaster Tools, Yandex Webmaster Tools, and Baidu Webmaster Tools.
Bing Webmaster Tools
To add a website to Bing (and Yahoo! as well), you need to choose one of the three methods: XML file authentication, meta tag authentication, or adding a CNAME record to the DNS. These methods are very similar to the GSC HTML file, meta tag, and domain name verification methods.
Yandex Webmaster Tools
This platform also offers a lot of useful services and tools to webmasters. Users can check how much traffic they have, upload a sitemap, see the indexed pages, indexing errors, etc. To add your site to this system, you need to go to the Webmaster menu, click Add the site, enter its URL, and choose one of the verification methods: add a meta tag, upload an HTML file, or use a TXT file in DNS.
Baidu Webmaster Tools
Baidu is the Chinese alternative to GSC designed to assist website owners to track and support their site’s presence in the organic search results. Just like Google, this tool offers a lot of metrics allowing to validate the site, submit broken links, submit content for indexation, identify crawling errors, and more.
Although they work for different search engines, all search consoles have similar principles and are must-haves for organizations looking to improve their SEO.
Adding several domains to one Google Search Console account
Users can add up to 1000 properties to their GSC account. Still, this remains to be a very controversial issue. Most webmasters agree that owners can add multiple domains to their accounts and it will not affect SEO. However, if anyone uses non-standard SEO techniques (techniques that are not welcomed by search engines), it would be wiser to keep your main projects separately. In this case, you’d better segment your websites and not add them in a single account.
Nevertheless, if you run official projects, for example, work for multiple customers as an SEO specialist or if you have an agency, you can add multiple properties in one account—it is just more convenient. Officially, there are no penalties from Google for affiliate websites.
How to connect Google Search Console to SE Ranking?
By connecting Google Search Console to SE Ranking, you can get a full view of GSC Performance on the Search Results report from one user interface, with no need to swipe between screens.
You can see the list of keywords, analyze and filter them according to ranking positions, clicks, impressions, and click through rate (CTR). Apart from the average keyword position displayed by GSC, you can also see the latest data from SE Ranking. Unlike Google, which updates ranking positions once in three days, SE Ranking provides you with more accurate daily updates.
By using the tool you can also expand your database of keywords—the module will help you discover which keywords you rank for, while they are not on your target keywords list. You can add them to your project to start tracking their rankings in one click.
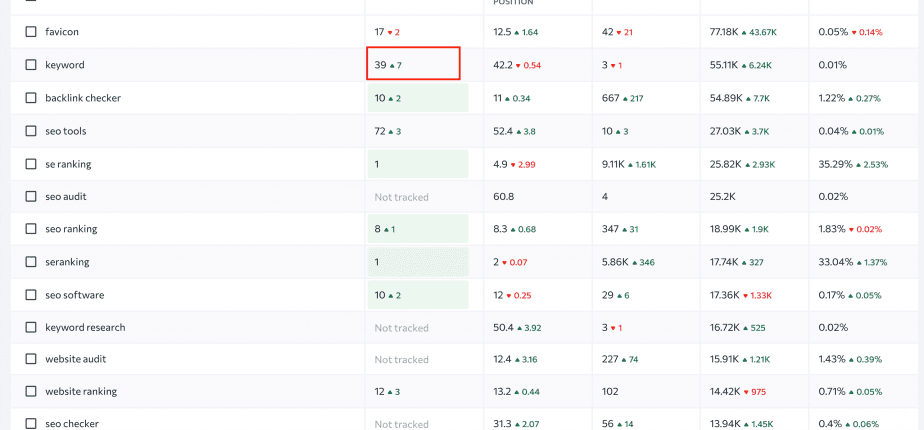
To connect GSC to SE Ranking, users have to log in to their Google account that is linked to Google Search Console.
After this, you will be able to view all GSC data on your dashboard. Here is what you can do with such an integration:
- Choose the date range, analyze one period, or compare two selected periods.
- Analyze clicks, impressions, CTR, position of the site in the search results.
- Filter the data by six different criteria: search type, device type, country, search appearance, query, URL.
- See keyword tabs that feature plenty of metrics and evaluate the success of the chosen keywords.
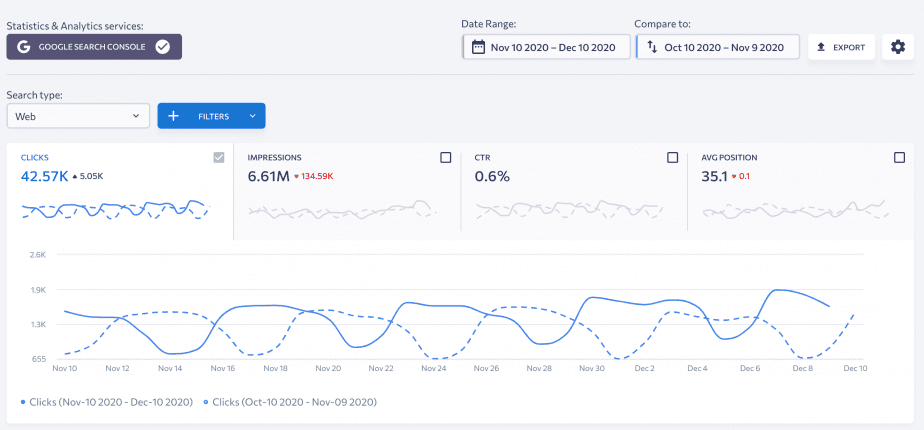
You can get data from Google Search Console that is integrated with SE Ranking to improve rankings for underperforming keywords, optimize pages with a low click-through rate, and find out what type of content attracts more traffic.
Post Views: 698
